This article describes how to "rip" 3d models, shaders and textures out of the games using as an API directx 6, 7, 8, 9, 10, 11 versions for both 64 and 32 bit and import ripped models/textures into 3DS Max, Noesis or Blender.
Note: The article is designed for expirienced 3ds Max users and doesn't cover detail things such as, for example, texturing objects, setting up materials, etc.
Note: The article is designed for expirienced 3ds Max users and doesn't cover detail things such as, for example, texturing objects, setting up materials, etc.
- 3ds Max (I'm using 2009 х86) should work on versions: 2009-2015
- Ninja Ripper v1.5.0 (ripper itself) Author: blackninja [page]
- ninja_importer v2.1 (3ds max import script) Author: 3Doomer [page]
- [не обязательно] ninja_importer v1.3 (3ds max import script) Author: blackninja [download]
- [не обязательно] Noesis v4.172 (3d model viewer/converter) Author: Rich W. [page]
- [не обязательно] Blender v2.49b (3d modeling software) Author: Blender Foundation [page]
1. Setting up the ripper.
Unpack the archive to any folder. Run the program.
Extracting all available vertex information of the models (position, all the texture coordinates, normals, weights, BLENDWEIGHT, BLENDINDICES, BINORMAL, TANGENT), indices, textures, shaders. Theoretically all extracted information could be import into the 3D editor! Support for Direct3D[11/10/9/8/7/6] (processed, however not all methods/techniques, but should work for 95% of all games).
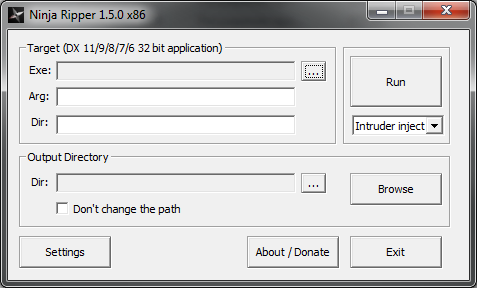
- Target (DX11, DX9, DX8, DX7, DX6, DDRAW 32/64 bit application):
- Exe - field for direct path for the executable file of the application/game;
- Arg - field for additional settings for executable file;
- Dir - field for direct path to the folder which contains executable file (filled automatically when you select .exe, no need to change by default);
- Intruder Inject - mode in which the ripper will try to run .exe of the application/game directly, using for ripping only intruder.dll, if this mode doesn't work (do not rip or even response) then you need to select one of the wrapper modes;
- wrapper modes - modes in which ripper will copy d3dX.dll in to the folder containing the executable file of the application/game, after this ripper windows can be closed (not for the firefox rip though), then you can start the game from any location, copied d3dX.dll will automatically hooks the render in the game. Thus no longer need to run the ripper itself for this game. Here are the available wrapper modes:
- D3D8 Wrapper - for directx8 games only;
- D3D9 Wrapper - for directx9 games only;
- D3D11 Wrapper - for directx11 games only;
- DDRAW Wrapper - for directx 6/7 games only;
Note: you need to delete .dll from the game folder manually (in case you want to use Intruder Inject mode), ripper configurations is stored in the registry.
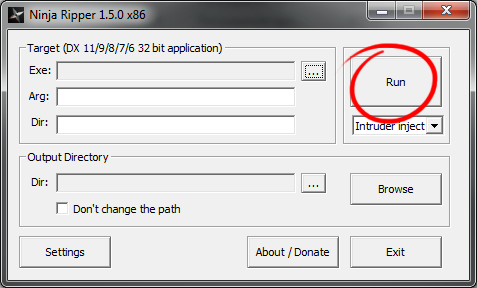
- RUN - button to start the application/game;
- Output Directory:
- Dir - field for output folder (filled automatically). This folder can be changed manually, be sure that checkbox "Don't change the path" is cheked;
- Browse - button to explore folder with selected .exe file;
- Don't change the path - uncheked atumaticaly filled with the path to selected executable;
- Settings:
- Rip Hotkeys - you can change rip buttons here:
- All - rip textures and 3d models;
- Textures - rip only textures;
- Forced - rip with time interval (for 3 seconds y default);
- Save Shaders (for experts) - activating this will forced save of the haders (sometimes does not allow to run the game);
- FForсed Rip Interval [X] second - as it said;
- Save DirectDraw Surfaces - texture/sprites, mostly fair for 95-99 years games;
- About/Donate - if you like this tool and want new features please support developers!
- Exit - closes ripper.
Select the game you want to "rip". In the Ripper window click the button '...' to select .exe of the game.

Note: You can add game's .exe by drag-and-drop from explorer window to the ripper window.
Choose the mode which is depends on what directX game is running. Modes description:
- Intruder Inject - mode in which the ripper will try to run .exe of the application/game directly, using for ripping only intruder.dll, if this mode doesn't work (do not rip or even response) then you need to select one of the wrapper modes;
- wrapper modes - modes in which ripper will copy d3dX.dll in to the folder containing the executable file of the application/game, after this ripper windows can be closed (not for the firefox rip though), then you can start the game from any location, copied d3dX.dll will automatically hooks the render in the game. Thus no longer need to run the ripper itself for this game. Here are available wrapper modes:
- D3D8 Wrapper - for directx8 games only;
- D3D9 Wrapper - for directx9 games only;
- D3D11 Wrapper - for directx11 games only;
- DDRAW Wrapper - for directx 6/7 games only;
Note: you need to delete .dll from the game folder manually (in case you want to use Intruder Inject mode), ripper configurations is stored in the registry
Start the game by pressing the Run button:
2. Game rip process.
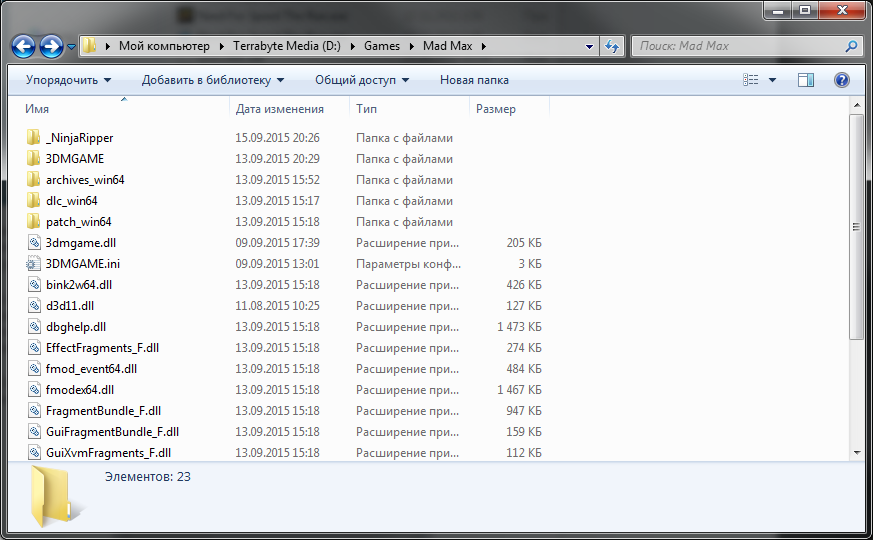
After game is started the folde _NinjaRipper will be created near the application exe. In game choose the desired location and click the "rip" button (F10 by default). After pressing F10 the game will "freeze" for a second, then it will run for a bit and "freeze" again for about 5-25 seconds. Duration of ripping process depends on complexity of the game and the computer capacity. During the ripping process all the ripped resources will be storing inside the _NinjaRipper folder. 3d model format is rip, texture format is dds.

Press Textures rip button (F9 by default) to rip the textures only. Press Forced rip button to rip for a period of a seconds. It's important for ripping web sites (ex: WebGl) with 3d models. Firefox is officially supported only. I should mention that normaly after ripping process is over the game will be unfreezed and you can continue it from the same point. However there're numerous of games which continue runnig during ripping process or games which screen will dimmed after ripping process so you can hear the game but can't see it.
The only tested browser is Firefox. Used specs: windows 7 x64, geforce GTX 660.
1. run
Ninja Ripper;
2. setup Settings/Forced button to F4 (or any other button wich browser doesn't use);
- setup Forced Rip Interval (sec) to 5-10 (defaul is 3 sec);
3. run firefox.exe through
ninja ripper (mode: D3D9 Wrapper);
4. open website you want to rip in firefox:
example:
https://sketchfab.com/models/68f2c2374a9f432b9672eb2e44d2cebd5. wait until webpage load completely;
6. tap F4 to start ripping process:
- models will be saved along with the textures (models can be duplicated multiple times);
7. open folder whith just ripped 3d models:
- search through the rip files by size for size pattern;
- identify the file after which the group begins to repeat;
- see firefox_rip_process_07.png for example. First 29 files it's a group you looking for;
- copy first group of the files to another folder along with the textures for convenience' sake;
8 load rip files into 3ds max with uv pair: 3-4 (with old importer):
[FURTHER PROPERTIES COULD VARY FROM SITE TO SITE OR FROM MODEL TO MODEL]
- search through the rip files by size for size pattern;
- identify the file after which the group begins to repeat;
- see firefox_rip_process_07.png for example. First 29 files it's a group you looking for;
- copy first group of the files to another folder along with the textures for convenience' sake;
9. each object consists of 2 meshes: main (most of the polygons - fliped most of the time) and secondary (some randome triangles):
- main object polygons need to be inverted;
- sometimes UV need to be inverted;
- almost every time meshes are randomly placed after import to the 3ds max scene.
10. to rip another model you have to clear Frame0000 folder first, because ripper will not create Frame0001 folder it will rip to Frame0000 folder again.
11. see final model:
12. list of websites with 3d models:
- http://p3d.in (scale: 1, uv: 6-7)
- https://sketchfab.com/ (scale: ?, uv: 3-4)
Here's setting for ripping from
Dolphin (Gamecube/Wii emulator). Used specs: windows 7 x64, geforce GTX 660:
1. setup Dolphin (ver. 4.0, sep 23):
- video: Direct3D9 (it works for Direct3D11 as well but meshes can't be imported correctly);
- all other settings are not important;
2. run
Ninja Ripper with setings:
3. run game in Dolphin and press ripping button (F10 default);
4. to import setup importer:
- Scale: 0.5 (на всякий случай используйте небольшой масштаб);
- RotateX: 0 (90 default);
- sometimes all ripped meshes can't be imported in Group mode.
Riped models from
pcsx2 (ps2 emulator) is heavily distorted and lack of polygons. Also the UV coordinated are not ripping correctly. So I suggest to use pcxs2 internal ripping feature:
- run version 0.9.8 of pcsx. It's the latest version which's have ripping function;
- setup pcsx2 video plugin (GS) as GSdx;
- use Direct3D9 (Software) as pcsx2 renderer;
- run game, find model you want to rip and press Shist+F8. This will save a screenshot as well as an object file of that scene in your pcsx2 folder called "snaps".
Ripping from from psp games useing
JPCSP is not possible. Because JPCSP works on Java. Hovewer you can "rip" models with JPCSP internal function:
- run JPCSP;
- run game and find a moment you want to rip;
- go to File -> Export 3D Scene (Wavefront .obj/.mtl) and choose either Only Visible elements or All elements will be ripped.
[/i]
3.
Importing models into 3ds max.For import the model choose rip file and press Import button. All available UV coordinates will be imported into uv channels. To install script copy everything from ninja_ripper_EvoGIMS_manualinstall.7z archive to 3ds Max install directory. To run importer go to your Utilities panel, look below the panel and press first Install button then Run.
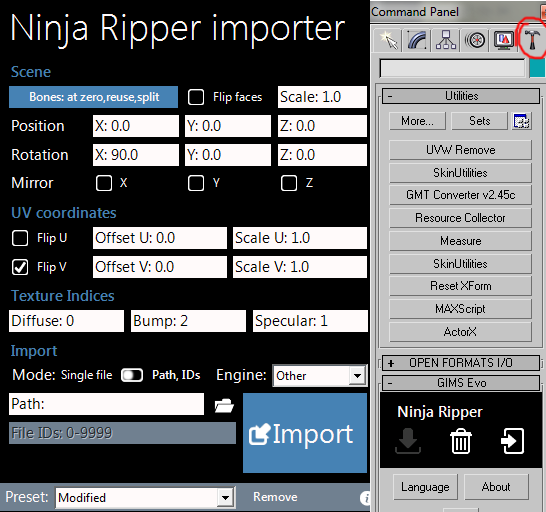
Here's detailed description of all the importer functions:
Scene
• Bones - choose to or not calculate bones along with the Skin modifier and weights on imported meshes :
- Don't create - bones and weights will be skipped on import;
- Create at zero - bones will be created at mesh pivot center also Skin modifier will be created on the mesh;
- Create at calculated position - bones will be created at calculated positions and Skin modifier will be created on the mesh;
- Reuse scene bones - existing in the scene bones will be reused with the new imported bones;
- Split the mesh by skinning when possible - as it says the mesh could be splitted by the mesh skinning properties;
• Flip Faces - check to flip polygons of the imported meshes;
• Scale - setup imported meshes scale;
• Position - setup XYZ position of the imported meshes;
• Rotation - setup XYZ rotation of the imported meshes;
• Miror - reflect imported meshes by XYZ;
UV coordinate
• Flip U - flips UV coordinates by U;
• Flip V - flips UV coordinates by V;
• Offset U/V - setup U or V offset ;
• Scale U/V - setup U or V scale;
Texture Indices. Look at the texture's ID which is related to the imported mesh. For example Tex_0001_0.dds defined by the number before ".dds" is usually used as diffuse texture.
• Diffuse - define which texture will be used for diffuse slot map by ID;
• Bump - define which texture will be used for bump slot map by ID;
• Specular - define which texture will be used for specular slot map by ID;
Import This section is for settings of the mesh import.
• Mode - choose to import single or group of files;
• Engine - use specific engine for meshes to import. For most of the time Other engine is just fine. However you can use the following engines: Frostbite 2, Frostbite 3, Frostbite 3.5, YETI engine;
• Path - path to the folders with rip files and textures. Press folder icon to change;
• File IDs - enter the mesh number to import. Could be the following input format: "0-15, 589, 67" or just "1" (without quotes);
• Import - button to start Import;
Open 3ds max. Menu
MAXScript > Run Script... choose a script ninja_importer.ms, window opens:
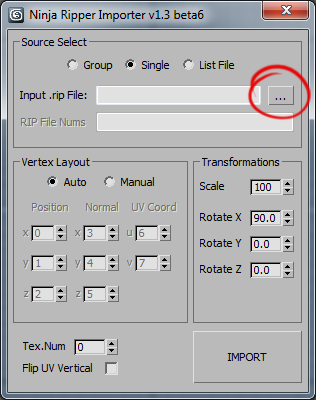
Importer function description:
- Source select (source selection and the import mode):
- Group - import group files
- Single - import single files
- List File - import files from list (not implemented yet)
- Input Dir/File - import source, the file or folder (depending on the selected mode)
- RIP File Nums - field to enter the file numbers to import (Group mode only), the input format is: 0-15, 589, 67
- Vertex Format (selecting the model building settings):
- Auto - mode to automatically identify groups of data (vertices, normals, uv-coordinates), will work for most games
- Manual - mode for manual definition of groups of data, you needed to import the models of the new games (mostly directx11)
- Position (x,y,z) - fields for enter data defining the position of the vertices of the model, even in manual mode these parameters in 99% of games will not change
- Normal (x,y,z) - fields for enter data defining the normals at each vertex of the model (not implemented yet)
- TexCoord (u,v) - fields for enter data defining texture coordinates of the model, one of the most important parameters. For games, wich model imports without a proper uv-coordinates, a pair of UV always choosing by search. At the time is Identified that pairs can not exceed number 50, that is can be 6-7 or 18-19 or 24-25 or 39-40 etc. In very rare cases, a pair of uv can be 3-4 or 4-5 or 5-6, which is within the "normal field of definition", as well as 8-6 or 12-11, which is at odds with common sense, but may still be.
- Transformations:
- Scale - the scale of the imported model
- Rotate - turn imported model on the selected axis
- Tex.0 File Level - choice of a number of the texture, which applies to the model after import
- Flip UV Vertical - will flip vertical texture coordinates
- IMPORT - button to start the import process
To import a model click Browse button:
Choose .rip the file and click Open button. Model will load into 3ds max. If you do not like the result, change the Vertex Layout import mode from Auto to Manual, an additional options will be available:
Will attach an image for a visual understanding of what kind of numbers and what they are accountable (color/area in the image below correspond to the colors in the image above):
This picture shows the data template of the .rip file. From the template follows: green zone (model), blue zone (normal), orange zone (uv, texture coordinates), details:
- ertex data (the model) is based on the first three values (00=x, 01=y, 02=z), also the numbers correspond to what is in the importer, thus 00=0=x, 01=1=y, 02=2=z. These values can be changed in the importer to accept any numbers, but in 99.99% of the games these values remain unchanged, and it is better not to touch them at all
- normal data (for smoothing groups models corresponding to the 03, 04, 05) - in the current version is not complete, changing the values not yield results
- uv, texture coordinates - represented by two numbers (06, 07, or 07, 08 or 24, 25), not three as in the case of vertices or normals - in 80% of the games are the same, but there are games (eg: Battlefield : Bad Company 2 or NFS: Run) where you need to change these values to get proper uv, and sometimes even go in the values of "normal zone" (ie, they can be 03, 04), but they are never go into "vertex zone". These values need to change simple by search the numbers. In the picture below - an example.

Thus selecting the model by setting the import (uv, scale, rotation, etc.) then press the IMPORT button. The model will load into 3ds max. You can also import models massively. To do this, instead of Single in Source Select choose Group and write the numbers corresponding to the .rip file's name this way: 15,489,0, 50-85 into RIP File Nums After setting up import process press IMPORT button, all files that match the written numbers will be imported into 3ds max.
Note: If files imoported into 3ds max (models/textures) will be to many than 3ds max will crash. So choose and import exactly what ever you wanna work with by looking in texture names.
Riped models (sometimes textures) can be also loaded into Blender or Noesis tools.
- use this python script to import models into Blender (by Akaito);
- script for Noesis is in the NinjaRipper archive;
4. About textures.
Textures are always .dds files. They are automatically loaded into 3ds max for most of the time. It should be noted that each model corresponds several textures, for example a model Mesh_0000.rip can have multiple textures with names Tex_0000_1.dds, Tex_0000_2.dds, Tex_0000_3.dds etc. But you can only load one of these textures in 3ds max. What is the texture will be loaded is selecting in the importer by changing number in Texture Indices function.
Note: If you use a programs for generating "preview" for .dds files in Windows explorer (I use Mystic Thumbs) then when ripping dx11 games the mini-preview for such .dds will not be shown, because they have wrong file header, the problem is not solved yet. However you can edit/view those dx11 .dds files in photoshop/irfanview/etc.
![How to use Ninja Ripper [ENG | Upd 09.12.2015]](/uploads/posts/tutorial-ninja-ripper.jpg)
![How to use Ninja Ripper [ENG | Upd 09.12.2015]](/uploads/posts/2015-12/1450101349_1441734536_title-image.jpg)